The Best Wood for Laser Cutting and Engraving
Solid hardwood at 3 mm, ±0.20 mm: how maple, alder and pear behave on a Glowforge, xTool, CO₂ or diode laser, and how to get clean edges and high-contrast engraving.
Nearly every laser problem people blame on their machine is a material problem. Inconsistent cut-through, wandering engraving depth, sudden scorching, edges that char on one side of the bed and not the other — all of these track back to thickness variation, resin content and glue lines rather than to laser power.
This guide covers the hardwoods we stock for laser work — European white maple, natural alder, the two new roasted (thermally modified) alder grades and Swiss pear — plus what to expect from the denser species, why solid hardwood beats hobby plywood, and how to set up jobs so the first sheet is a keeper rather than a test piece.
What our material test cards show
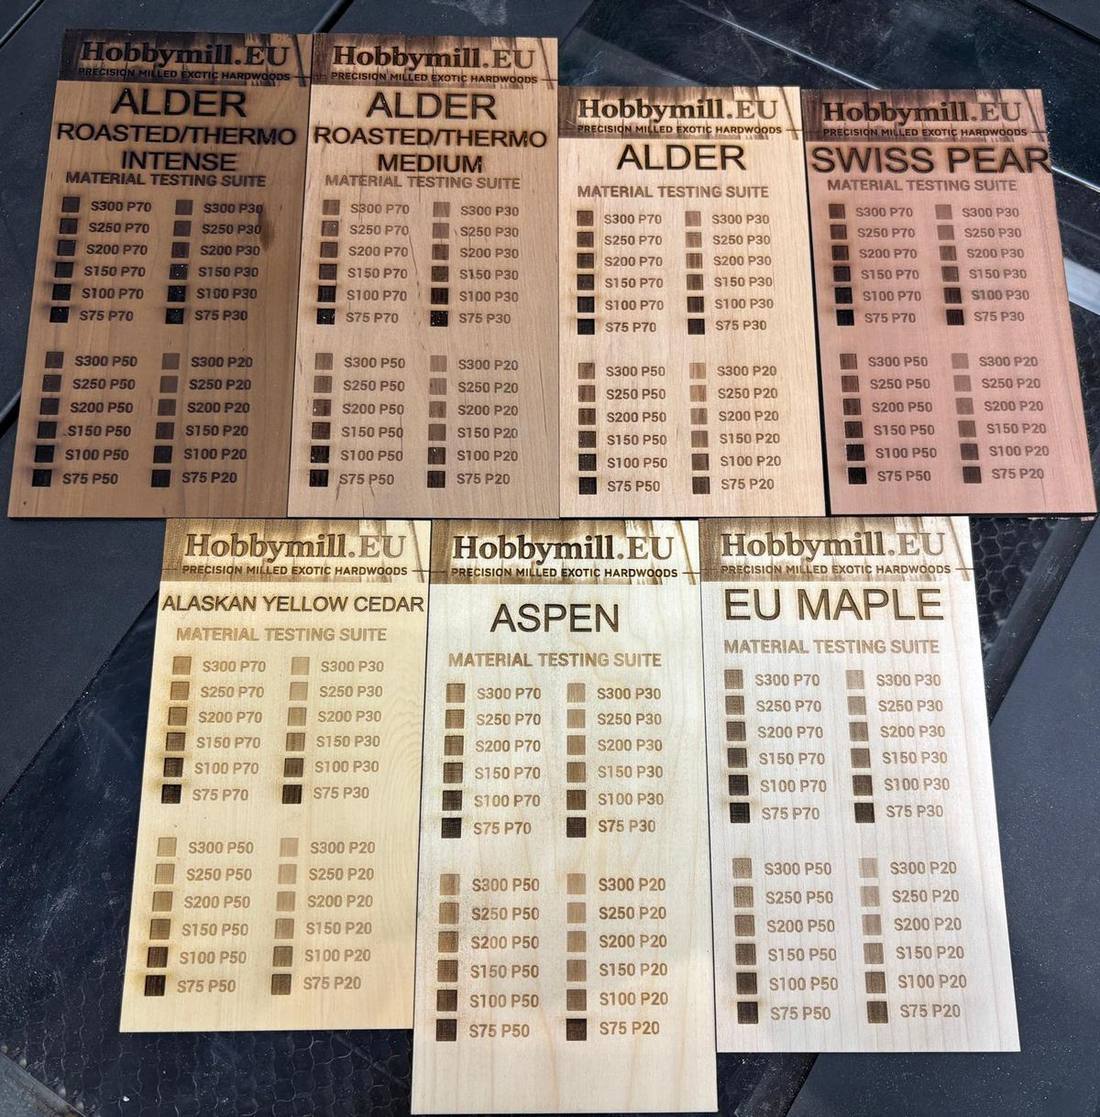
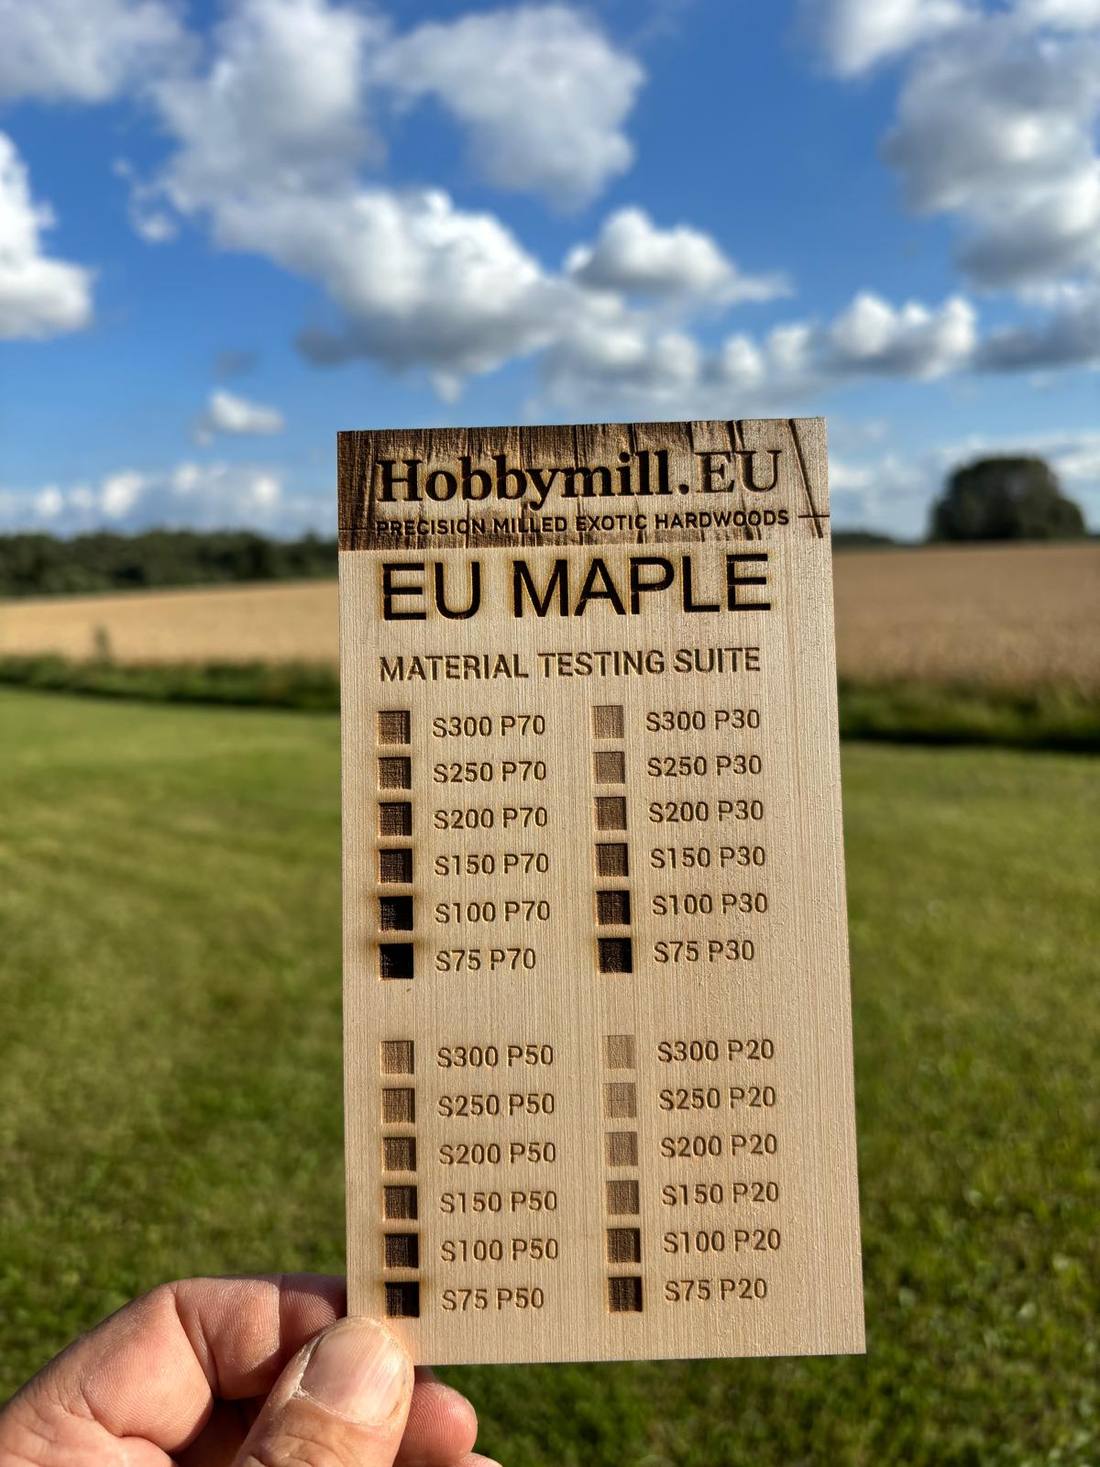
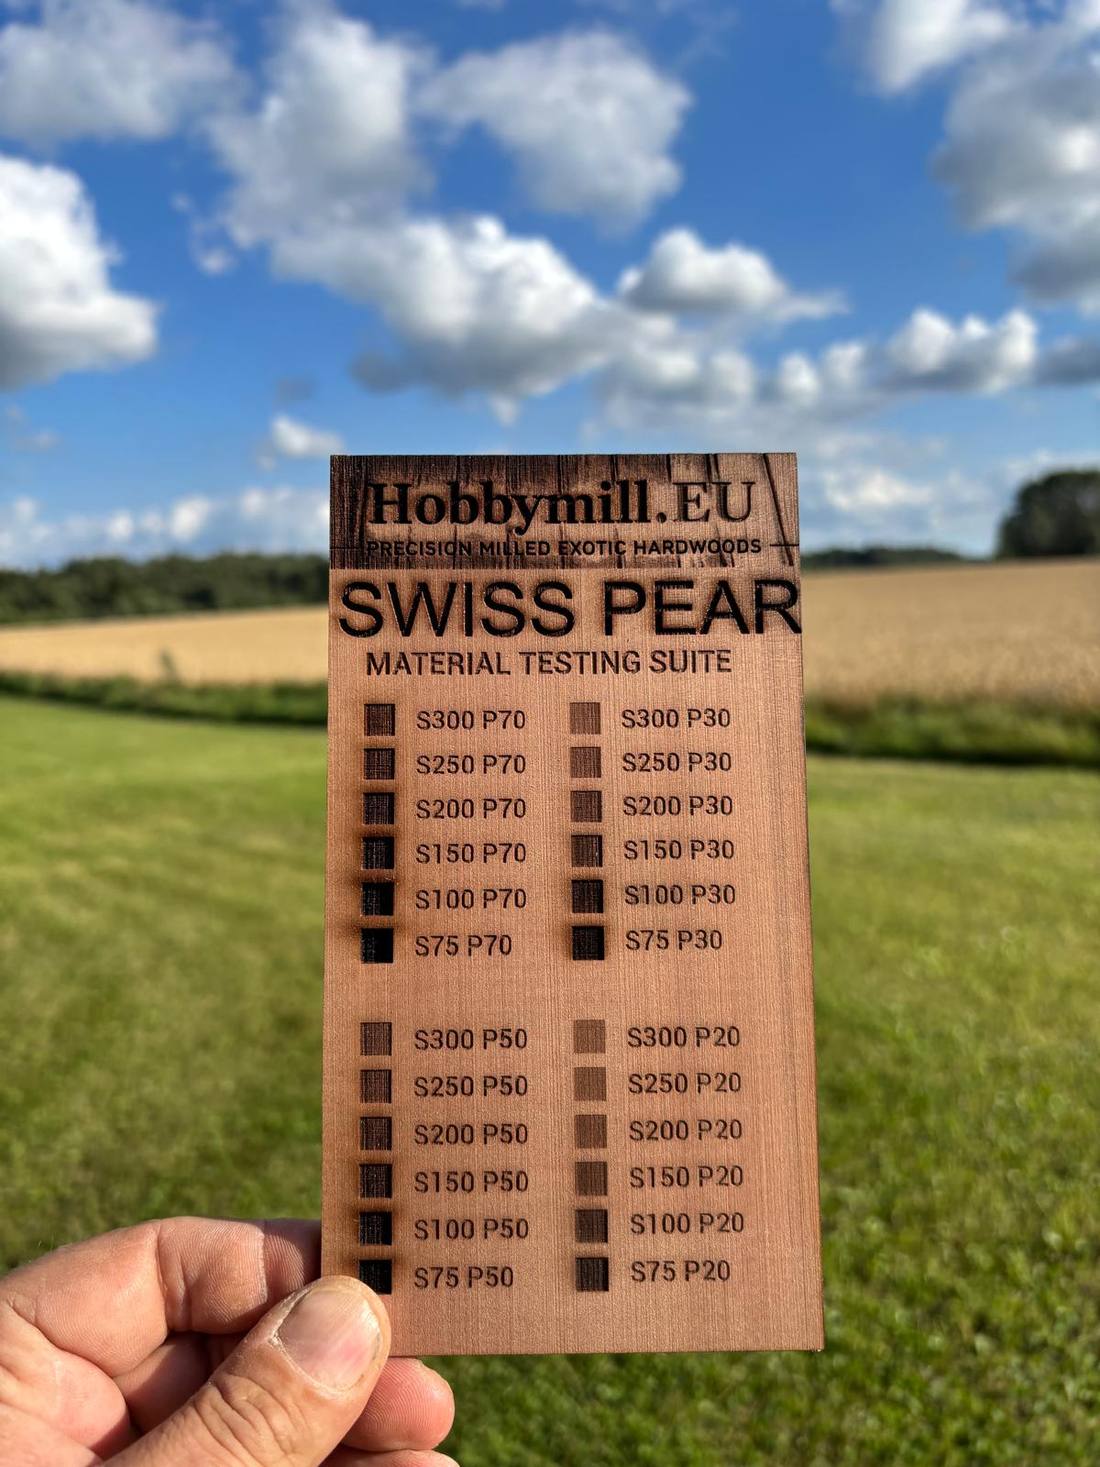
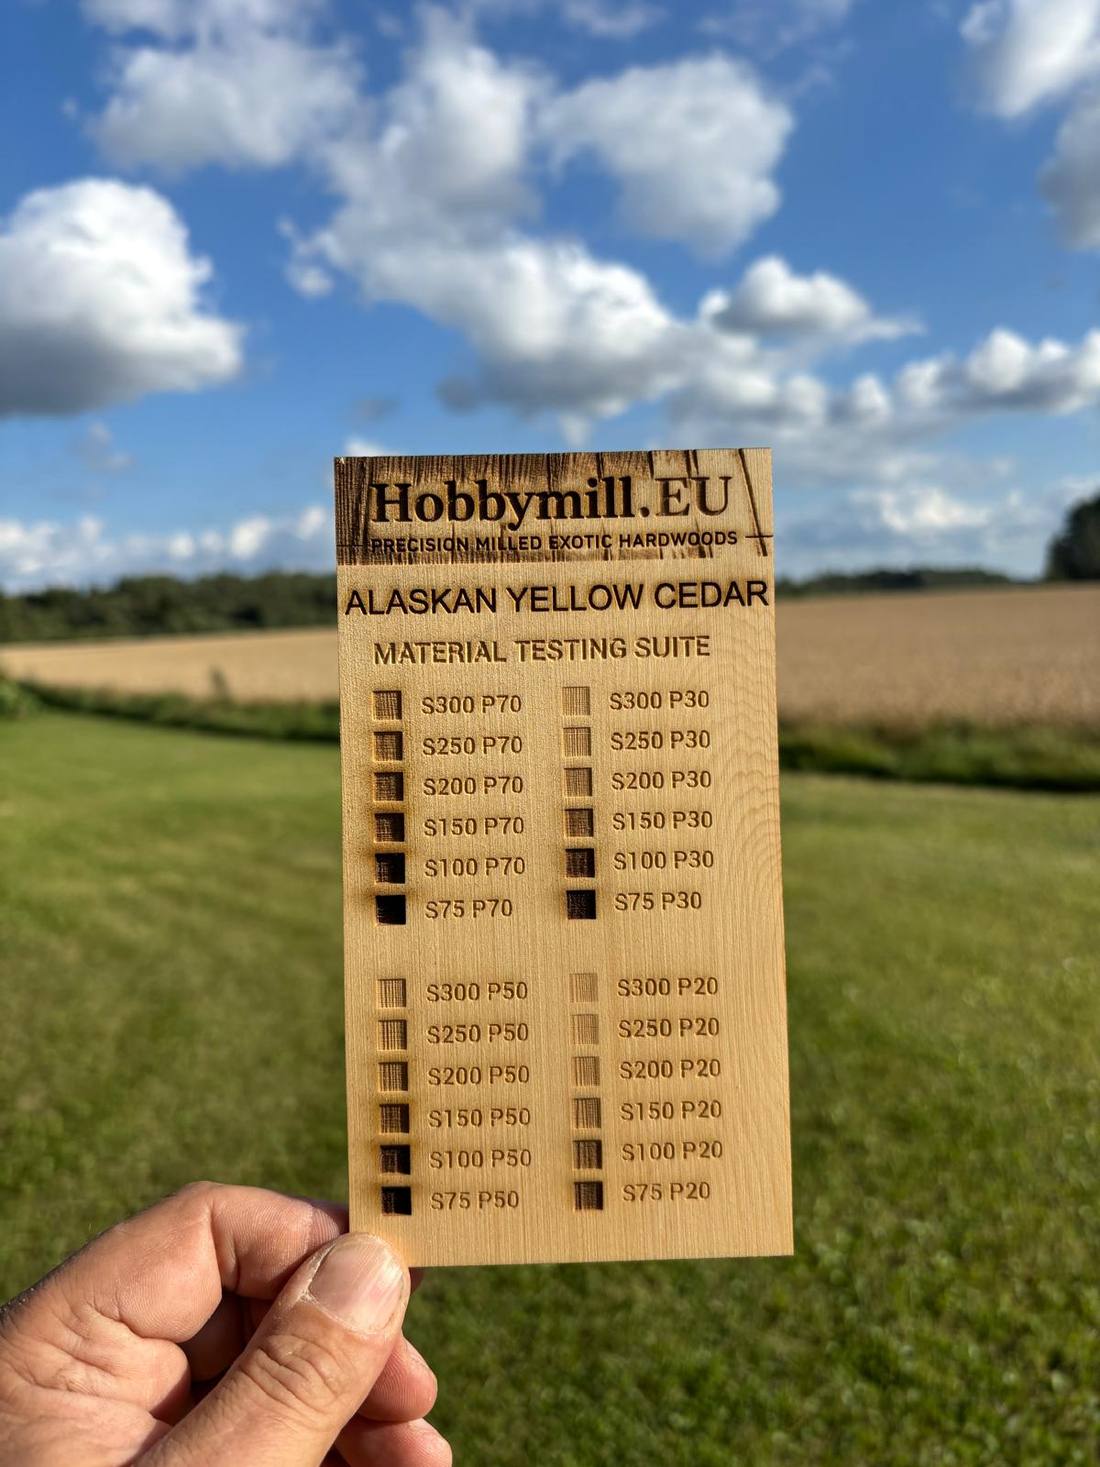
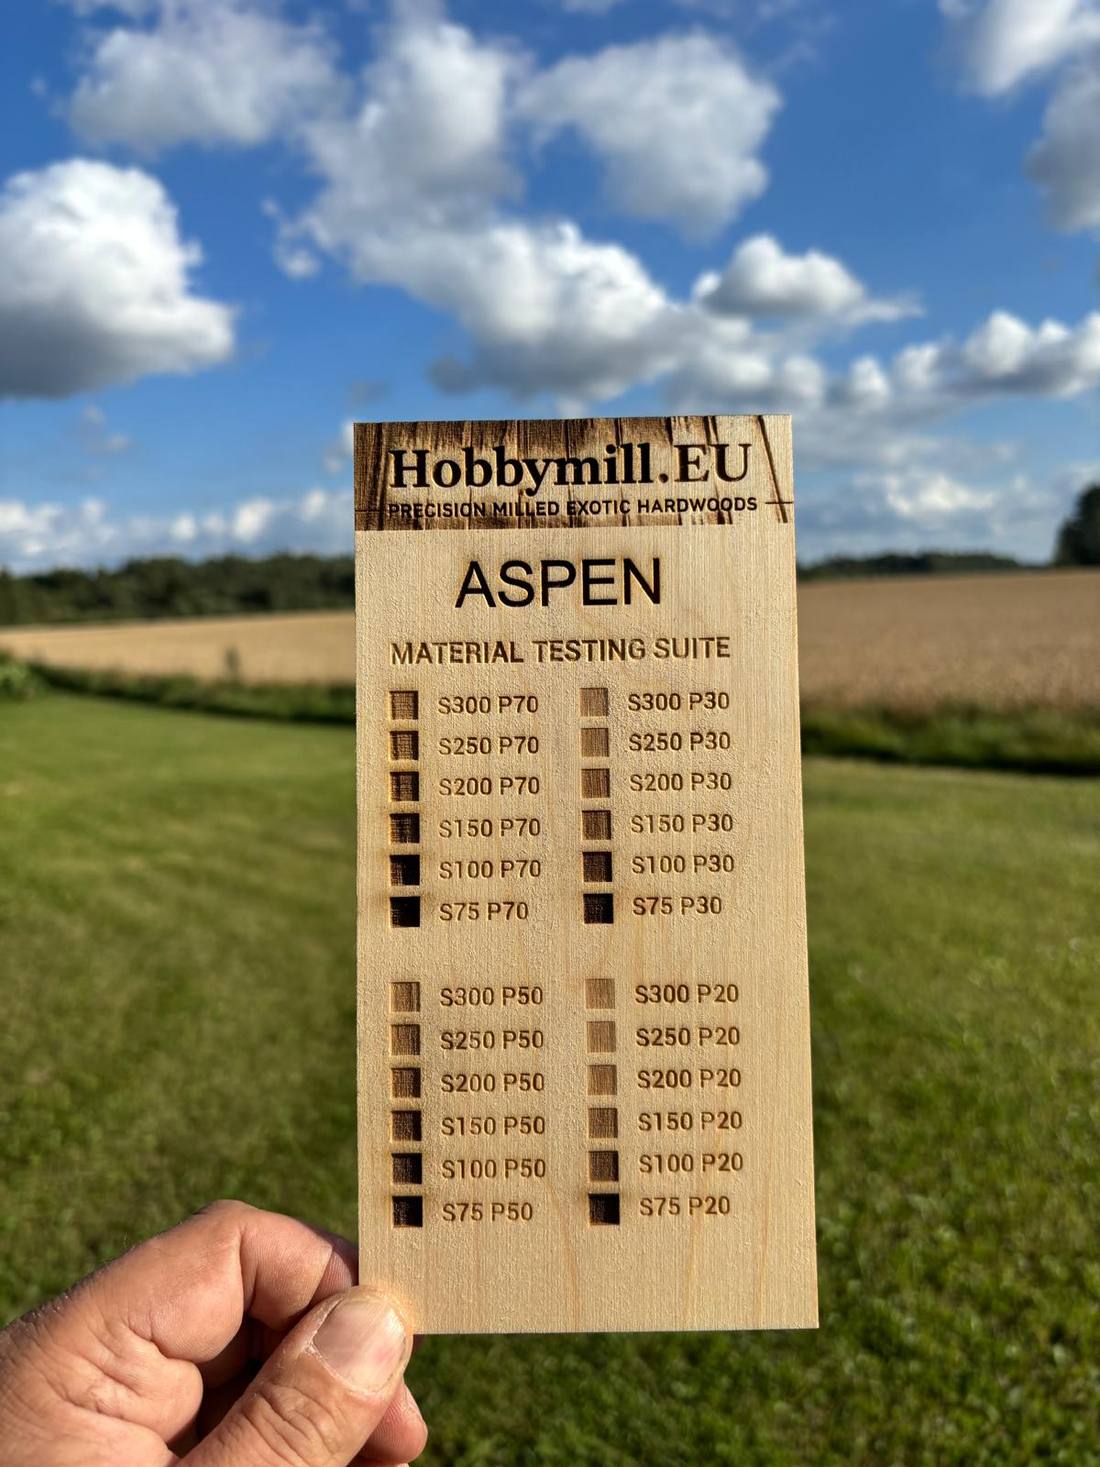
Every sheet species we sell gets the same material testing suite engraved on it: a grid of speed and power combinations from S300 P20 up to S75 P70. Because the card is identical across species, the differences you see are the wood, not the file.
Aspen and Alaskan yellow cedar appear here for information only — we mill them as modelling stock rather than selling them as laser sheets. Two things jump out. First, how much darker a given setting reads on a pale wood than on a warm one. Second, how much the roasted (thermo) alder grades shift the whole scale — engraving on them goes almost black, while the untouched face stays a deep caramel or chocolate brown.
Why the material decides your results
A laser is a focused beam with a very short depth of field. When the sheet under it varies in thickness by half a millimetre — normal for cheap 3 mm plywood — the focal point sits above the surface in one place and inside the material in another. Cut power that was correct at the origin fails at the far corner, and raster engraving that was crisp becomes soft.
Our laser sheets are held to ±0.20 mm (±0.008 in) across the sheet, which keeps focus effectively constant on a 3 mm job. That is the single biggest change most people can make to their results.
Resin and glue are the other two variables. Softwoods with resin pockets flare and scorch unpredictably. Plywood has glue lines that burn darker than the wood around them, leaving a striped edge, and voids that swallow the beam and leave an uncut bridge. Solid hardwood has neither.
| Factor | Solid hardwood | Hobby plywood |
|---|---|---|
| Thickness consistency | ±0.20 mm | Often ±0.50 mm or worse |
| Edge appearance | Even tone, no lines | Dark glue lines, striped edge |
| Voids | None | Common — causes uncut bridges |
| Engraving contrast | Even across the sheet | Varies with veneer patching |
| Smell and residue | Clean wood smoke | Adhesive fumes, heavier residue |
| Finishing | Stains and oils evenly | Face veneer only; edges look different |
Maple vs alder vs pear
Three woods cover the realistic range of laser jobs: maximum engraving contrast, fastest and cheapest cutting, and a warm-toned finished part.
European White Maple — the engraving wood

Maple is near-white, extremely even and low in resin, which gives it the widest tonal range between untouched surface and engraved char of anything we stock. That range is what a raster photograph needs: without it, mid-tones collapse and the image reads as a silhouette.
It also cuts cleanly at 3 mm and holds a sharp edge, so it doubles as an inlay wood where you want pale pieces that stay pale. Expect slightly more power for cut-through than alder and slightly more visible edge char, which is why masking pays off on maple more than on any other species here.
- Best for: photo engraving, high-contrast raster art, awards and signage, inlay, pale contrast elements.
- Sizes: A4 297×210 mm, 150×300 mm and 100×300 mm at 3 mm (1/8 in).
- Masking: recommended for engraving-heavy jobs.
Alder — the production cutting wood

Alder is lighter and softer than maple, so it cuts through 3 mm faster, at lower power, with noticeably less edge char. If you are producing kit parts, boxes, fretwork or signage in quantity, alder is the economical default: fewer passes, less cleanup, less consumed machine time.
Its engraving contrast is good but not maple's — the base colour is a light tan with a pink cast rather than near-white, so the tonal range is narrower. For vector work and line engraving that difference is irrelevant; for photographs it is decisive.
- Best for: production cutting, kit parts, boxes, fretwork, prototyping, vector engraving.
- Sizes: A4 297×210 mm, 150×300 mm and 100×300 mm at 3 mm (1/8 in).
- Masking: optional — edge char is already low.
Roasted / Thermo Alder — Medium (new)
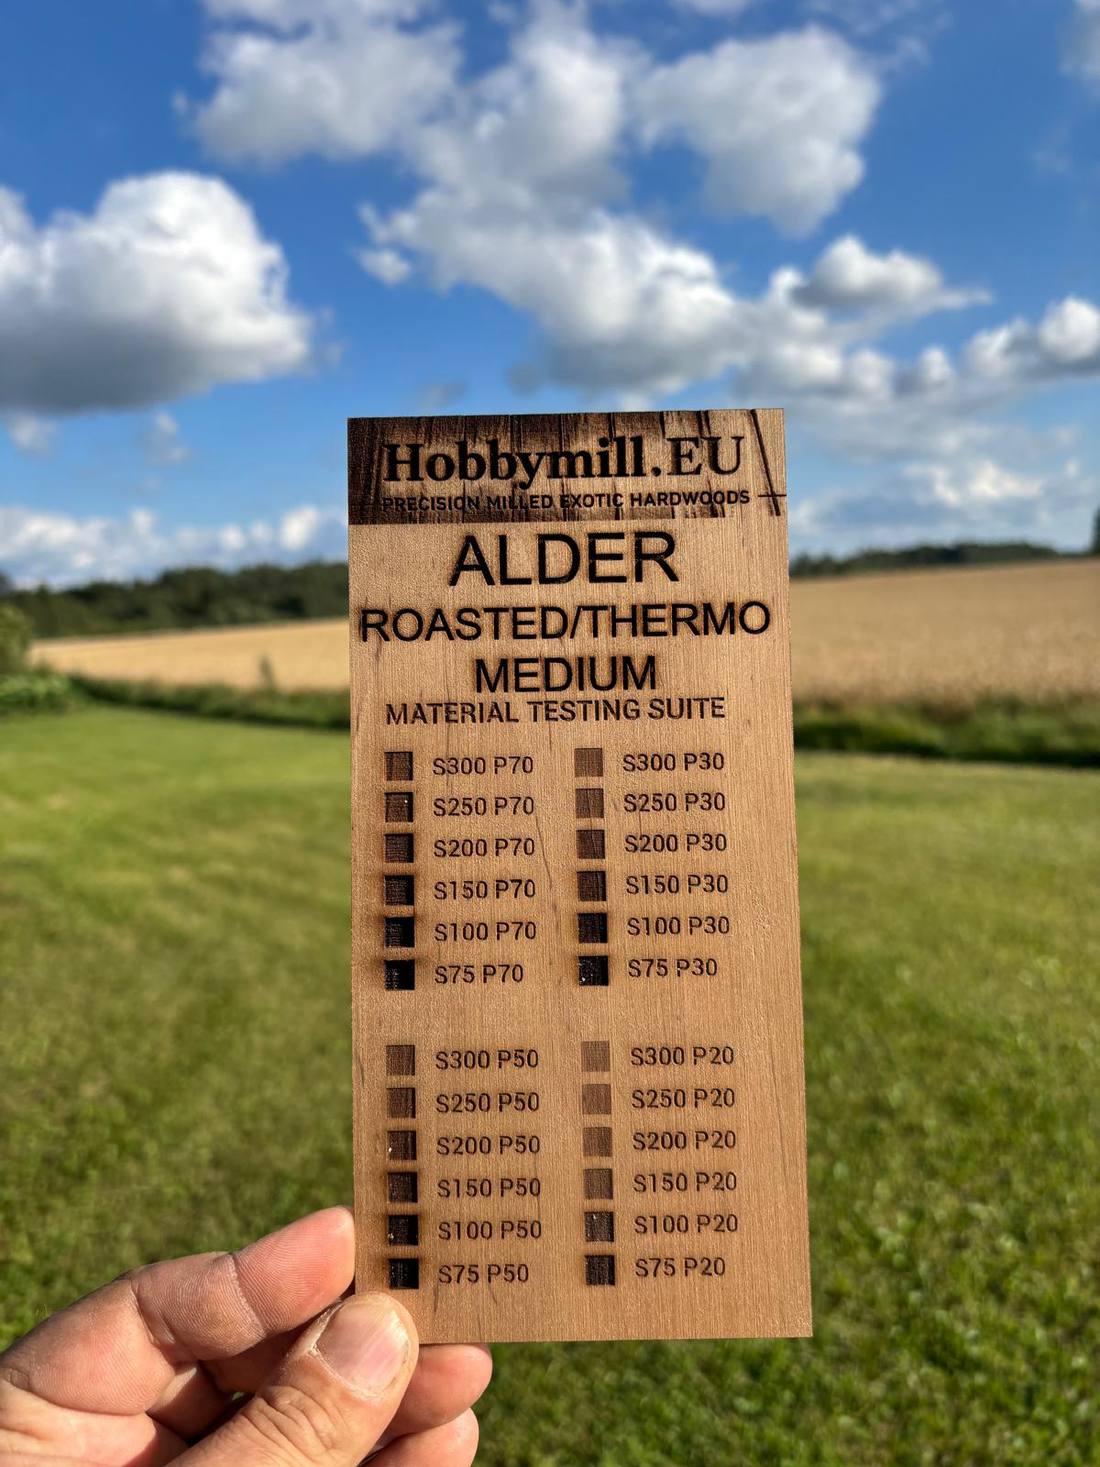
Thermally modified alder is ordinary alder that has been heat-treated in a controlled kiln — no chemicals, no stain. The heat cooks the sugars right through the board, so the colour is not a surface treatment: cut it, sand it or engrave into it and the tone is the same all the way through. That is the whole point for laser work, because an engraved pocket in stained wood shows pale wood underneath, and in thermo alder it does not.
The Medium grade lands at a warm caramel-to-tobacco brown. It keeps alder's easy cutting behaviour — heat treatment removes moisture and makes the wood slightly lighter and more brittle, so if anything it cuts marginally faster than natural alder at the same settings — and engraving goes a rich dark brown to near-black against that warm background. It is our pick when you want a finished part that already looks stained and oiled without any finishing step.
Two practical side effects of heat treatment worth knowing: the wood is more dimensionally stable and far less prone to cupping in a damp workshop, and the smoke smells noticeably different — sweeter, more like roasted coffee than green wood.
The trade-off is strength. Heat treatment makes the wood brittle, so we do not recommend thermo alder as a load-bearing or free-standing material on its own. It works best when the laser-cut pieces are glued down onto a stronger backing surface — plywood, maple, MDF or the body of the object itself — which carries the load while the thermo alder provides the colour and detail.
- Best for: finished parts with a warm tone, signage, coasters and keepsakes, contrast against pale inlay.
- Colour: uniform caramel/tobacco brown through the full thickness.
- Cutting: as easy as natural alder, slightly lower power for the same depth.
- Strength: brittle — not recommended alone; glue cut pieces to a stronger backing.
- Masking: recommended — soot is less visible than on maple but still dulls the colour.
Roasted / Thermo Alder — Intense (new)
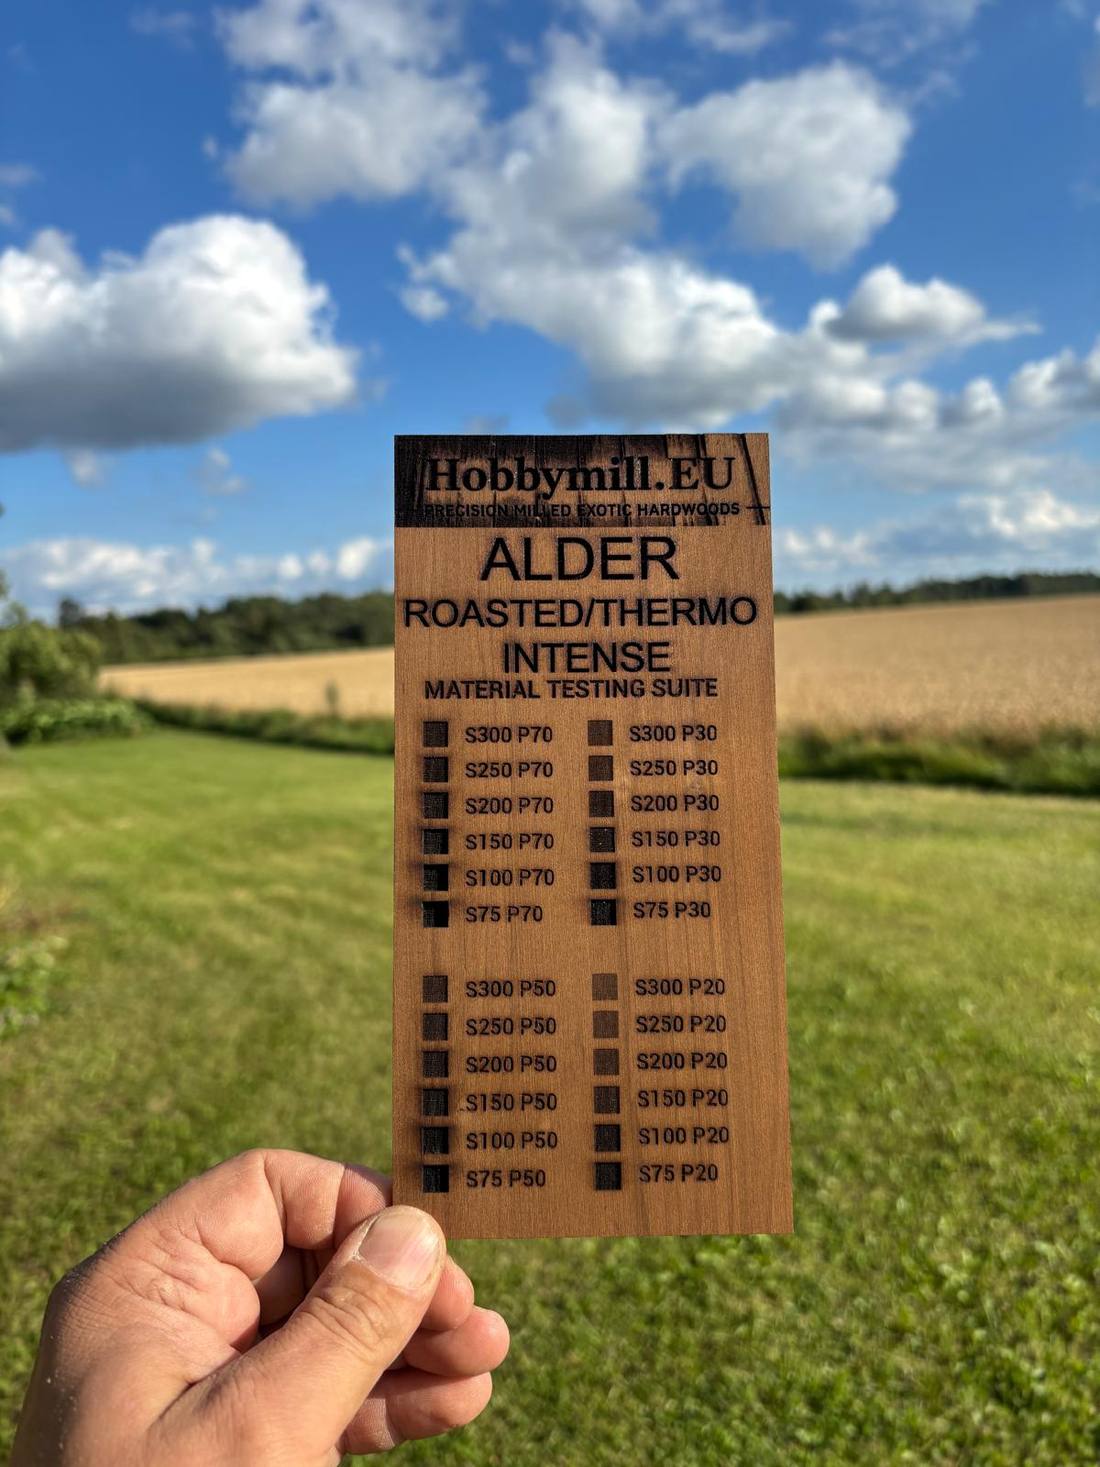
The Intense grade is the same wood taken further up the temperature curve. The result is a dark chocolate brown that reads almost like walnut, and an engraving that goes properly black. Contrast on Intense is not as wide as on maple — the base is already dark — but it is the highest-contrast dark wood we offer, and it is far more consistent than any dark tropical species.
It is also the answer to a question we get constantly: how to get a dark laser part without dyeing, without ebony and without black hornbeam's problem of engraving invisibly. Intense engraves visibly because the char is blacker than the surrounding wood, not the same colour as it.
Because more of the sugars are gone, Intense is more brittle than Medium — the most fragile of the three alder grades. We do not recommend using it on its own for anything structural or free-standing: glue the laser-cut pieces onto a stronger backing surface (plywood, maple, MDF or the object itself) and let that carry the load. Used that way it is perfectly reliable; used alone, thin parts and hair-thin bridges will snap.
- Best for: dark finished parts, walnut-look panels, jewellery, inlay against pale woods, anything that would otherwise be dyed.
- Colour: dark chocolate brown through the full thickness.
- Engraving: black on brown — visible, unlike black hornbeam.
- Strength: fragile — not recommended alone; glue cut pieces to a stronger backing and widen fine bridges.
Natural vs Medium vs Intense side by side
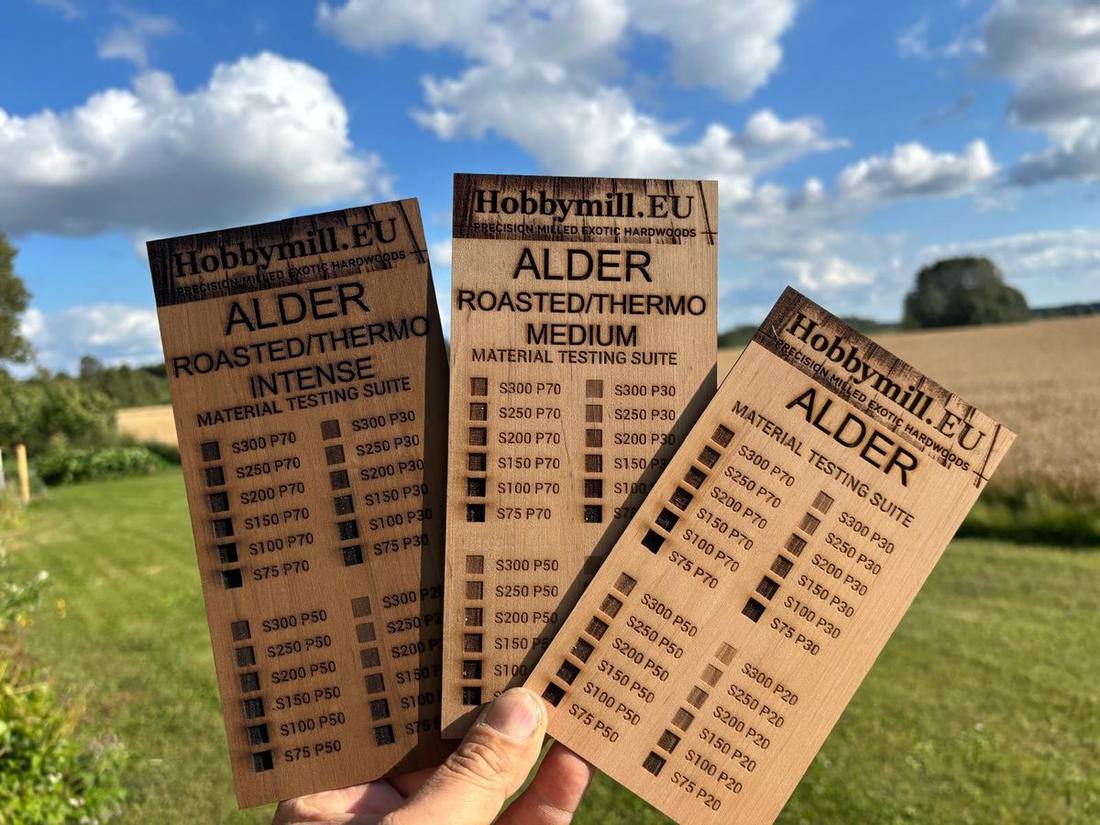
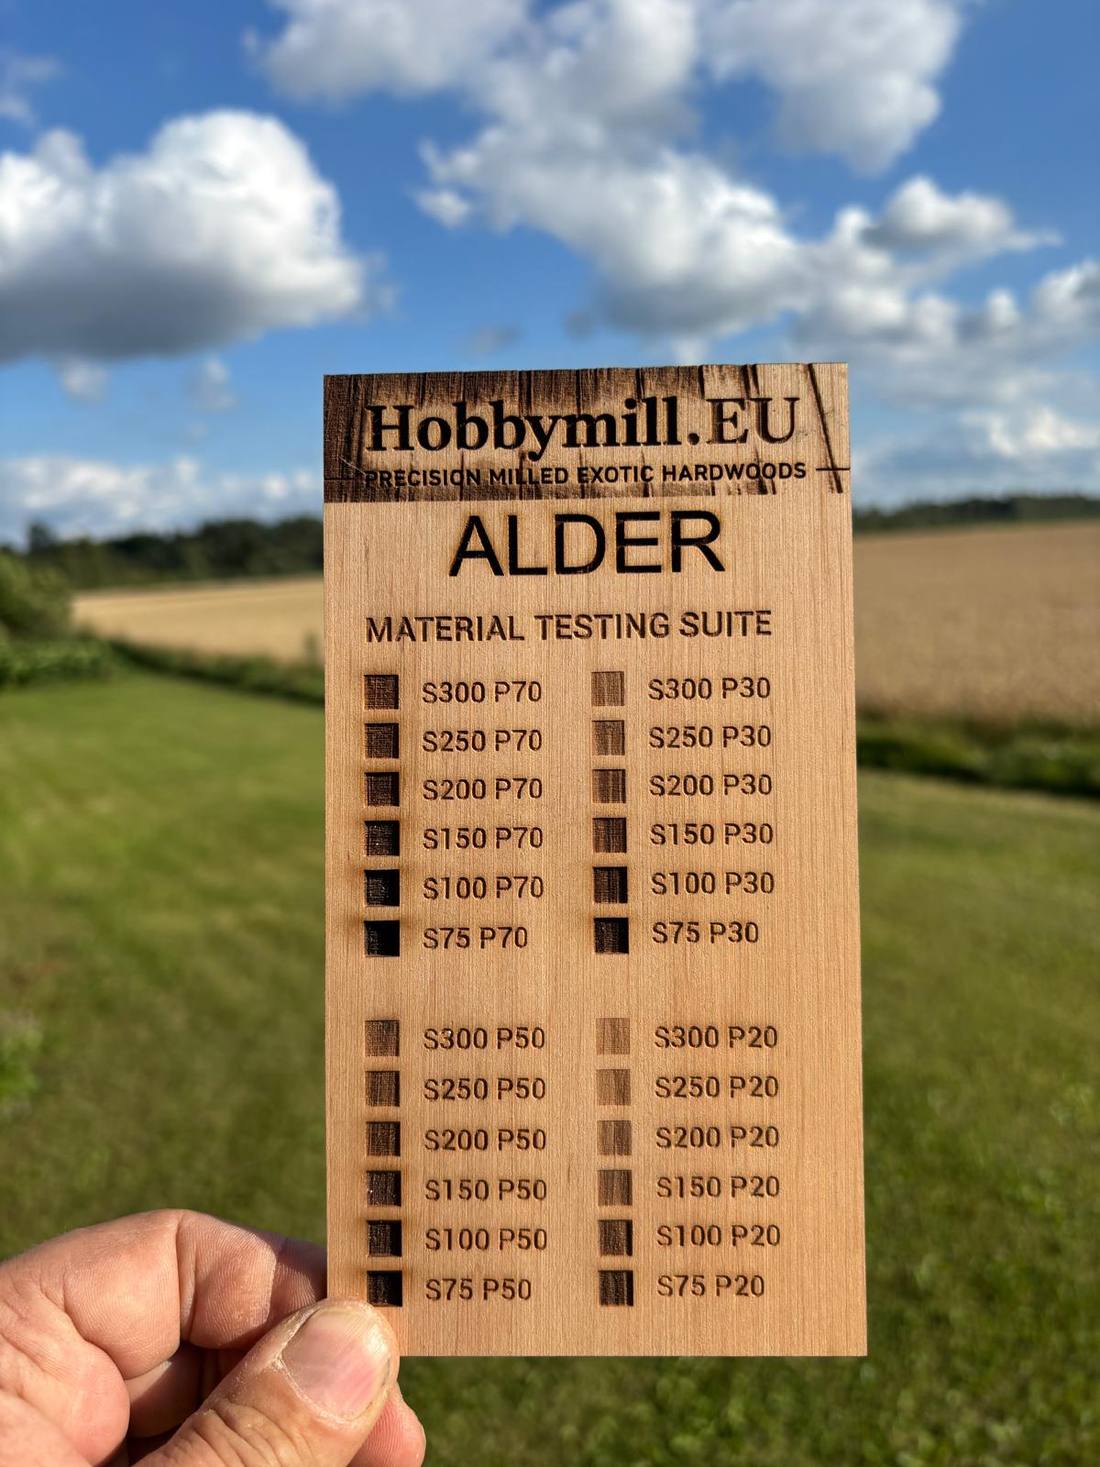
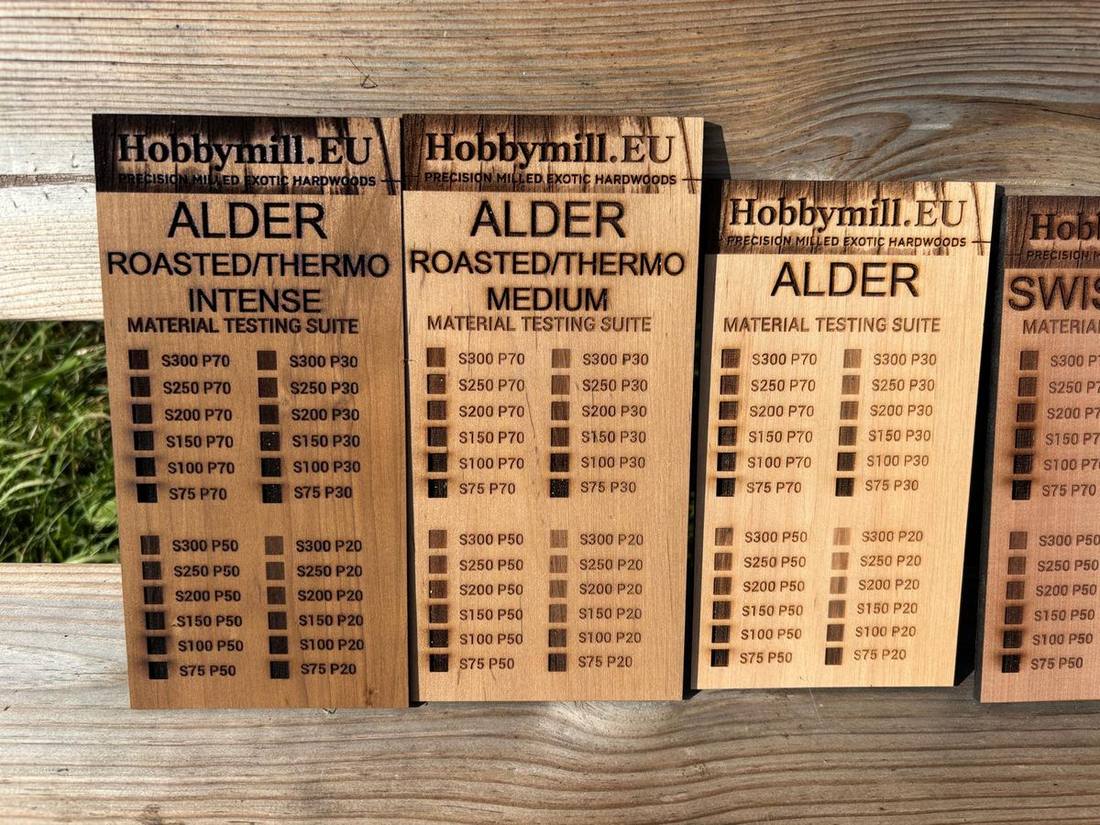
Same species, same engraving file, three heat levels. This is the clearest way to choose: pick the background tone you want the finished part to have, because all three behave almost identically under the beam.
If you are producing kit parts where the wood will be painted or hidden, stay with natural alder — it is the cheapest of the three. If the wood is the finish, the roasted grades save you a staining step and never blotch, because there is no stain to blotch.
One structural difference does matter: both roasted grades are brittle compared with natural alder, Intense most of all. Use them as a surface layer — glued onto plywood, maple, MDF or the object itself — rather than as a self-supporting part. Where the piece has to take load or stand on its own, use natural alder or maple underneath and keep the thermo alder as the visible face.
Natural alder 3 mm laser sheets · Order roasted alder in a custom size
Swiss Pear — the finished-part wood

Pear is the choice when the laser-cut part is the finished object rather than a component: jewellery, decorative panels, instrument rosettes, marquetry elements, presentation pieces. Its warm pinkish-brown is more attractive under a clear finish than either of the pale woods, and its extremely fine grain means small cut features stay crisp.
It sits between maple and alder for cut speed and shows moderate char. Engraved areas go a rich dark brown against the warm background — lower contrast than maple, but often better looking.
- Best for: finished decorative parts, jewellery, rosettes and inlay, marquetry elements, premium products.
- Size: 100×250 mm at 3 mm (1/8 in).
Boxwood and hornbeam on a laser
People ask whether they can laser Castello boxwood or black hornbeam. Technically yes, and there are legitimate reasons to — cutting a boxwood inlay to match hand-carved fittings, for example. Practically, both are dense enough to need substantially more power for a given depth, both char more visibly, and black hornbeam engraves almost invisibly because the char and the wood are the same colour.
That is why we do not stock them as laser sheets. If you need a laser-cut part in either species, order sheet stock in the thickness you want and expect to spend time on settings — or use the Custom Quote Calculator to have it milled to your exact dimensions.
Laser performance comparison
| Property | EU White Maple | Alder | Thermo Alder Medium | Thermo Alder Intense | Swiss Pear |
|---|---|---|---|---|---|
| Colour | Near-white | Light tan, pink cast | Caramel / tobacco brown | Dark chocolate brown | Warm pinkish-brown |
| Colour depth | Natural | Natural | Through the thickness | Through the thickness | Natural |
| Density (kg/m³) | 620–650 | 480–520 | 440–480 | 410–450 | 700–720 |
| Cut speed at 3 mm | Moderate | Fastest | Fastest | Fastest | Moderate |
| Power needed | Medium | Lowest | Lowest | Lowest | Medium |
| Edge char | Moderate | Low | Low (hidden by tone) | Low (hidden by tone) | Moderate |
| Photo engraving | ★★★★★ | ★★★★☆ | ★★★★☆ | ★★★☆☆ | ★★★★☆ |
| Vector engraving | ★★★★★ | ★★★★☆ | ★★★★★ | ★★★★☆ | ★★★★☆ |
| Detail retention | ★★★★☆ | ★★★☆☆ | ★★★☆☆ | ★★★☆☆ | ★★★★★ |
| Dimensional stability | Good | Good | Excellent | Excellent | Good |
| Strength | Strong | Strong | Brittle — glue to a backing | Fragile — glue to a backing | Strong |
| Masking recommended | Yes | Optional | Recommended | Recommended | Yes |
| Thickness tolerance | ±0.20 mm | ±0.20 mm | ±0.20 mm | ±0.20 mm | ±0.20 mm |
| Minimum order | 1 sheet | 1 sheet | 1 sheet | 1 sheet | 1 sheet |
| Job | Use | Why |
|---|---|---|
| Photo raster engraving | Maple | Widest tonal range from pale base to dark char |
| Production kit cutting | Alder | Fastest cut-through, lowest power, least cleanup |
| Jewellery and finished decor | Pear | Warm colour, finest detail retention |
| Inlay pieces | Maple or Pear | Sharp edges, stable thickness for flush fitting |
| Signage and awards | Maple | Contrast reads at a distance |
| Boxes and enclosures | Alder | Economical, clean finger joints |
| Model kit parts | Alder or Pear | Alder for volume, pear where parts stay visible |
| Instrument rosettes | Pear | Fine grain, warm tone under finish |
| Warm finished part, no staining | Thermo Alder Medium | Caramel colour goes right through — engraves dark, never blotches; glue to a backing |
| Dark or walnut-look part | Thermo Alder Intense | Chocolate brown with black engraving; no dye, no ebony; brittle, use over a backing |
| Two-tone inlay | Maple + Thermo Alder Intense | Maximum light/dark contrast; the maple carries the strength |
| Load-bearing or free-standing part | Maple or natural Alder | Thermo grades are too brittle to use alone |
Settings, focus and workflow
Every machine differs, so treat published settings as a starting point and always run a test grid on the same sheet you will cut. What follows is workflow rather than numbers — the parts that transfer between machines.
- Run a power/speed grid on the corner of your first sheet from a new batch, not on a scrap of something else. Species and thickness both shift the answer.
- Set focus to the actual measured thickness. With ±0.20 mm stock, one measurement is valid for the whole sheet; with cheap plywood it is not.
- Cut with air assist if you have it. It removes the smoke that would otherwise re-deposit as haze around the kerf and is the single biggest improvement to edge cleanliness.
- Prefer one pass at higher power over three passes at low power for 3 mm hardwood. Multiple passes widen the kerf and increase char.
- Engrave before you cut. Cutting first releases parts that can shift on the bed.
- Mask engraving-heavy jobs with low-tack transfer tape. It stops smoke staining and peels off with the residue.
- Keep the honeycomb clean. Resin build-up on the bed reflects unevenly and scorches part undersides.
- For inlay, cut the pocket and the insert with kerf compensation applied to only one of them, not both.
- On roasted/thermo alder, start about 10–15% below your natural alder power. The wood is drier and lighter, so the same settings cut slightly deeper and over-char the kerf.
- Plan roasted/thermo alder parts as a glued-on face layer. The heat treatment makes the wood brittle, so design the load into a backing panel — plywood, maple or MDF — and treat the thermo alder as the visible surface, not the structure.
- Store sheets flat and acclimatised. A cupped sheet defeats your focus setting no matter how good the tolerance is.
Controlling char and cleaning edges
Some char is unavoidable — it is combustion, not a defect. The goal is to keep it even and confined to the kerf wall rather than smeared across the face.
Masking handles face staining. For edges, a light pass with 320-grit paper on a flat block removes the loose soot layer without rounding the arris; a fine sanding sponge works for curved parts. On pale woods, wiping with a barely damp cloth before sanding lifts soot that would otherwise be driven into the grain.
If edges are charring badly rather than lightly, the usual causes are too many passes, too slow a feed, no air assist, or a dirty lens. Check in that order.
Finishing laser-cut hardwood
- Oil finishes deepen colour and hide minor char beautifully on pear and alder; on maple they warm the white slightly, which may or may not be what you want.
- Shellac is the safest finish over engraved detail — it does not pool in the engraving the way thick varnish does.
- Water-based stains blotch on alder and maple. Use a wash coat of dilute shellac first, or choose dye over pigment stain.
- Do not finish before cutting. Finishes flare, produce inconsistent kerfs and can release unpleasant fumes.
- For inlay, finish after gluing and levelling, never before — clamping pressure marks a finished surface.
What not to put in a laser
- PVC and vinyl — release chlorine gas that destroys machines and lungs. Never.
- MDF — cuts, but the binder produces heavy formaldehyde-laden smoke and a very dark, crumbly edge.
- Unknown treated or painted timber — coatings can be chlorinated or contain heavy metals.
- Resinous softwoods with visible pitch pockets — they flare and can flame.
- Anything reflective. Bare metal will bounce the beam back into the machine.
Frequently asked questions
- What is the best wood for laser engraving photos?
- European white maple. Its near-white, low-resin surface gives the widest tonal range between the unengraved face and the dark char, which is what preserves mid-tones in a raster photograph. Alder is the next best and pear gives a warmer but lower-contrast result.
- What is the best wood for laser cutting in production?
- Alder. At 3 mm it cuts through faster and at lower power than maple or pear, with the least edge char, so per-part machine time and cleanup are both lower.
- Is solid hardwood better than plywood for laser cutting?
- Yes for quality. Plywood has glue lines that burn darker than the wood, internal voids that leave uncut bridges, and much looser thickness tolerance. Solid hardwood gives an even edge, no voids and consistent focus.
- Why does my laser cut through in one corner but not the other?
- Almost always thickness variation or a non-flat sheet moving your focal point. Stock held to ±0.20 mm and stored flat removes the variable; after that check bed level and lens cleanliness.
- Do I need to mask the wood before engraving?
- For engraving-heavy jobs on pale woods like maple, yes — low-tack transfer tape prevents smoke staining the surface. For vector cutting on alder it is usually unnecessary.
- What thickness should I order for laser work?
- 3 mm (1/8 in) is the standard and is what we stock. Order the nominal thickness exactly — do not add a sanding allowance, because your focus and power settings are calibrated to it.
- Can I laser cut boxwood or black hornbeam?
- Yes, but both are dense, need more power and char more. Black hornbeam also engraves poorly because the char is the same colour as the wood. We stock them as sheet and lumber rather than laser sheets; custom thicknesses can be milled to order.
- What is roasted or thermo alder?
- Alder that has been heat-treated in a controlled kiln — no chemicals or stain. The heat darkens the wood right through its thickness, so cut edges and engraved pockets are the same colour as the face. We offer two grades: Medium (caramel/tobacco brown) and Intense (dark chocolate brown).
- Does thermo alder laser differently from natural alder?
- Barely. It is drier and slightly lighter, so it cuts at the same or marginally lower power. Start about 10–15% below your natural alder settings and adjust. Engraving reads dark brown to black against the warm background.
- Is thermo alder strong enough to use on its own?
- No — heat treatment makes the wood brittle, and the Intense grade especially. We do not recommend using thermo alder alone for structural, load-bearing or free-standing parts. It works best when the laser-cut pieces are glued onto a stronger backing surface — plywood, maple, MDF or the object itself — which carries the load while the thermo alder gives the colour and detail.
- Which is better for a dark laser-cut part — thermo alder intense or black hornbeam?
- Thermo alder Intense, in almost every case. Black hornbeam engraves almost invisibly because the char and the wood are the same colour, whereas Intense engraves black against brown so the detail actually reads. Intense is also easier to cut — just remember it is brittle, so glue the parts to a stronger backing.
- Will the colour of thermo alder fade or sand off?
- It will not sand off — the colour goes through the full thickness. Like any wood it will shift slightly under long UV exposure, so a UV-inhibiting clear finish is worth it on parts that live in daylight.
- Does a diode laser work with these woods?
- Yes for engraving on all three, and for cutting 3 mm alder with a sufficiently powerful diode and multiple passes. Maple and pear at 3 mm are demanding for lower-power diodes — expect slower going or step down in thickness.
- How do I remove char from cut edges?
- A light pass with 320-grit paper on a flat block removes the loose soot without rounding the edge. Wipe pale woods with a barely damp cloth first so soot lifts rather than being sanded into the grain.
- What is the minimum order for laser sheets?
- One sheet — there is no minimum order, and the listed price is per single sheet. Custom sizes and thicknesses in any of our species can be quoted through the Custom Quote Calculator.